本地 Hexo
安装 Node.js
安装 Git
在本地新建文件夹 blog_hexo
1
2
3
4
5
6
cd D:\blog_hexo> npm install hexo-cli -g hexo init npm install hexo-deployer-git --save git clone -b master https://github.com/jerryc127/hexo-theme-butterfly.git themes/butterfly npm install hexo-renderer-pug hexo-renderer-stylus --save
修改_config.yml 文件,将 theme: landscape 修改成 theme: butterfly
关于在左上角开启主页/分类/标签功能,请查阅 分类/Tags 显示 404 问题
在本地预览
Hexo+Github Page
在 Github 网页新建同名仓库 xie-dd.github.io
修改 D:\blog_hexo_config.yml
1 2 3 4 deploy: type: git repo: https://github.com/xie-dd/xie-dd.github.io.git branch: master
部署到远程
注意:hexo g -d 会将 public 目录中的文件和目录推送至 _config.yml 中指定的远端仓库和分支中,并且完全覆盖该分支下的已有内容
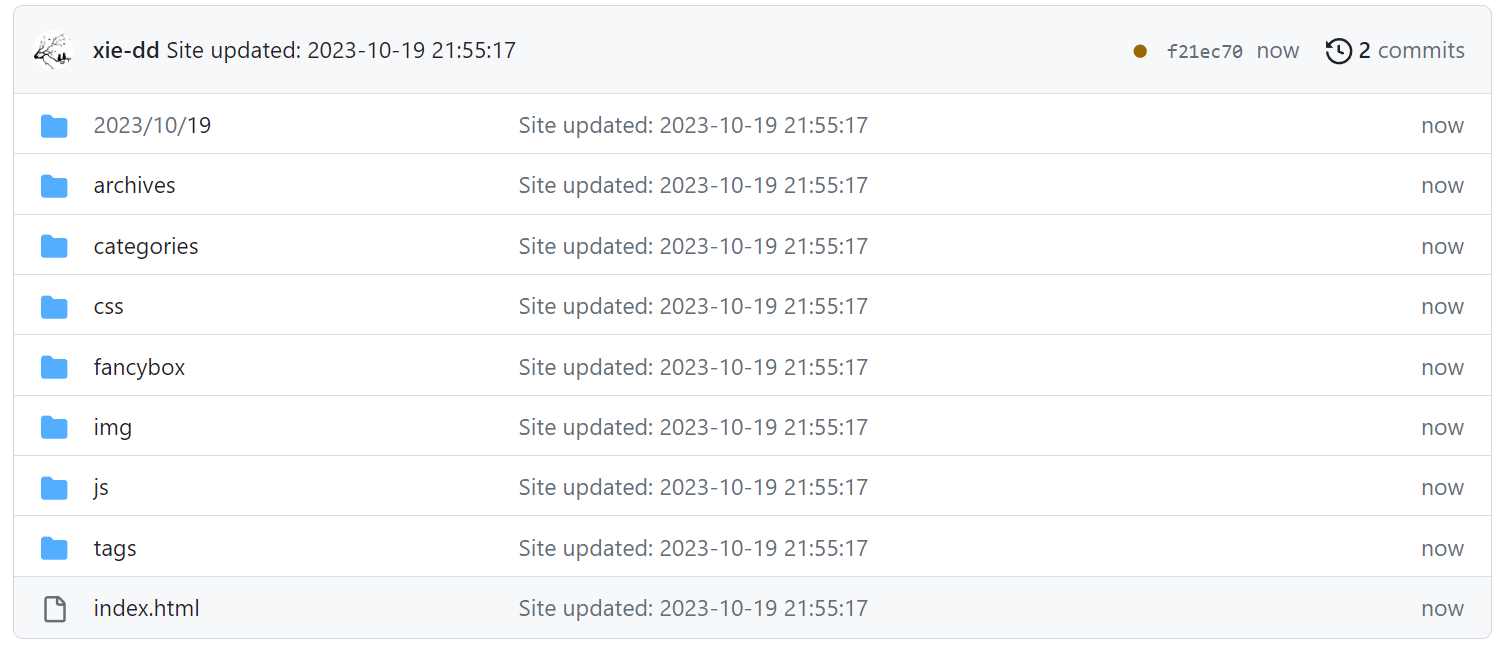
远程最终是这样的:
网页访问 https://xie-dd.github.io/ 即可
Hexo+Github Page+Github Action
接着上面的 blog_hexo 文件夹操作
参考:使用 Hexo 和 Github Actions 自动化博客更新-bilibili
访问 Github—头像(右上角)—Settings—Developer Settings—Personal access tokens—generate new token—创建的 Token 的名称随意,但必须勾选 repo 项 和 workflows 项—复制 Token
在 Github 创建用于存放博客所有文件的 **私有仓库 **blog_hexo_repo (必须是私有仓库,因为 Token 的问题我没解决掉
点击仓库 Setting—Sectets and variables—Actions—New repository secret—Name:DEPLOY_BLOG—Secrets:粘贴第 1 步复制的 Token
在本地 blog_hexo 文件夹创建新文件夹.github,在.github文件夹内新建 main.yml 文件
在 main.yml 文件粘贴下面内容:
1 2 3 4 5 6 7 8 9 10 11 12 13 14 15 16 17 18 19 20 21 22 23 24 25 26 27 name: Deploy Hexo Blog on: push: branches: [master] jobs: bulid: runs-on: ubuntu-latest steps: - uses: actions/checkout@v2 - name: Setup Node.js environment uses: actions/setup-node@v3.8.1 with: node-version: 18.12.1 - name: Deploy Blog env: DEPLOY_BLOG: ${{secrets.DEPLOY_BLOG}} run: | git config --global user.name "xie-dd" git config --global user.email "xie-dd@outlook.com" npm install npm run build npm run deploy
修改 D:\blog_hexo_config.yml 文件,将
1 2 3 4 deploy: type: git repo: https://github.com/xie-dd/xie-dd.github.io.git branch: master
修改为:
1 2 3 4 5 6 7 deploy: type: git repo: github: url: https://github.com/xie-dd/xie-dd.github.io.git branch: master token: 这里填写你的Token, 正是因为这里要填写Token,所以blog_hexo_repo仓库不能公开
在本地 blog_hexo 文件夹将代码推送到远程
1 2 3 4 5 6 git init git remote add origin https://github.com/xie-dd/blog_hexo_repo.git git checkout -b master git add . git commit -m "github action update" git push origin master
git 上传结束后会触发 Github Action, 然后会自动部署内容到博客页面
Hexo+Github Page+Github Action+语雀 几个注意事项
语雀拉取文章有延迟,需要注意
这里实际有两种情境
第 1 种,先在本地命令行执行 yuque-hexo sync,再 git 推送到远程。这样即部署到了博客页面,也把语雀文章备份到本地以及 Github 仓库了
第 2 种,不在本地命令行执行 yuque-hexo sync,直接在本地 git 推送到远程。这样会在 Github Action 中拉取语雀内容并部署到博客页面,但是语雀内容不会备份到本地,也不会备份到 github 仓库
配置流程
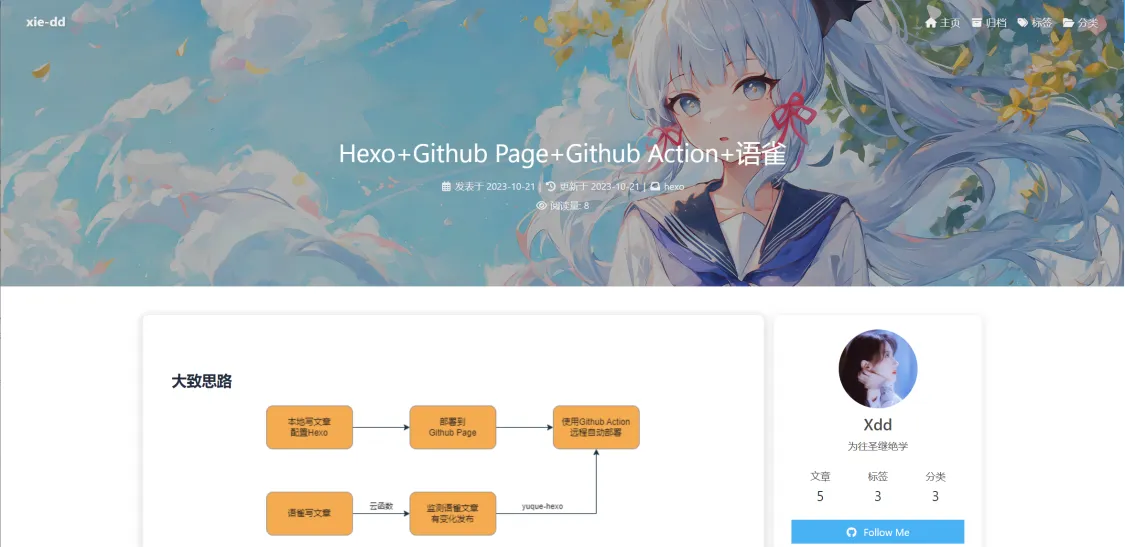
Hexo:语雀云端写作 Github Actions 持续集成
获取语雀 Token
获取语雀用户名与语雀知识库短链接
语雀上写一篇文章并发布,文章内容格式如下,注意不要渲染 三个短横线
1 2 3 4 5 6 --- title: Hexo+Github Page+Github Action tags: [test] --- content
网页 Github 仓库 blog_hexo_repo—Setting—Sectets and variables—Actions—New repository secret—Name:YUQUE_TOKEN—Secrets:粘贴语雀的 Token
在本地安装 npm i -g yuque-hexo
修改文件 D:\blog_hexo\package.json
1 2 3 4 5 6 7 8 9 10 11 12 13 14 15 16 17 18 19 20 21 22 23 24 25 26 27 28 29 30 31 32 33 34 35 36 37 38 39 40 41 42 43 44 { "name": "hexo-site", "version": "0.0.0", "private": true, "scripts": { "start": "yuque-hexo clean && yuque-hexo sync && hexo clean && hexo generate", "build": "hexo generate", "clean": "hexo clean", "deploy": "hexo deploy", "server": "hexo server", "sync": "yuque-hexo sync", "clean:yuque": "yuque-hexo clean" }, "yuqueConfig": { "postPath": "source/_posts", "cachePath": "yuque.json", "mdNameFormat": "title", "adapter": "markdown", "concurrency": 5, "baseUrl": "https://www.yuque.com/api/v2", "login": "xdd1997", "repo": "blog", "token": "粘贴你的语雀token", "onlyPublished": true, "onlyPublic": true }, "hexo": { "version": "6.3.0" }, "dependencies": { "hexo": "^6.0.0", "hexo-deployer-git": "^4.0.0", "hexo-generator-archive": "^2.0.0", "hexo-generator-category": "^2.0.0", "hexo-generator-index": "^3.0.0", "hexo-generator-tag": "^2.0.0", "hexo-renderer-ejs": "^2.0.0", "hexo-renderer-marked": "^6.0.0", "hexo-renderer-pug": "^3.0.0", "hexo-renderer-stylus": "^3.0.0", "hexo-server": "^3.0.0", "hexo-theme-landscape": "^1.0.0" } }
修改文件 D:\blog_hexo.github\workflows\main.yml
1 2 3 4 5 6 7 8 9 10 11 12 13 14 15 16 17 18 19 20 21 22 23 24 25 26 27 28 29 30 31 32 33 34 35 36 37 name: Deploy Hexo Blog on: push: branches: [master] jobs: bulid: runs-on: ubuntu-latest steps: - name: Checkout Repository master branch uses: actions/checkout@master - name: 设置 Node 环境 uses: actions/setup-node@v3.8.1 with: node-version: 18.12.1 - name: 设置 Hexo 依赖项并生成 Public 文件. env: YUQUE_TOKEN: ${{ secrets.YUQUE_TOKEN }} run: | npm install hexo-cli -g npm install yuque-hexo -g npm install npm run start - name: 部署到xie-dd.github.io网站 uses: peaceiris/actions-gh-pages@v3 with: personal_token: ${{ secrets.DEPLOY_BLOG }} external_repository: xie-dd/xie-dd.github.io publish_branch: master publish_dir: ./public commit_message: ${{ github.event.head_commit.message }}
推送到远程并自动部署博客网页。这里有几种选择:
(1)在本地执行 yuque-hexo sync,然后执行 hexo g -d。这种情况语雀文章会被下载到本地,然后部署到网页,但是不会上传语雀文章到 Github 仓库,自然也不会触发 Github Action
(2)在本地直接执行 git add commit push 三件套,这样会将本地原来的文章上传到 Github,于是触发了 Github Action,然后自动爬取语雀文章,部署到网页。这种情况不会备份语雀文章到本地,也不会备份语雀文章到 Github 仓库
(3)在本地执行 yuque-hexo sync,然后执行 git add commit push 三件套,这样会触发 Github Action,然后自动爬取语雀文章,部署到网页。这种情况会下载语雀文章到本地,也会备份语雀文章到 Github 仓库(推荐)
Hexo+Github Page+Github Action+语雀+云函数 https://19970622.xyz/posts/2046/
Hexo+Github Page+Github Action+语雀+任务计划程序
win+R—taskschd.msc—创建基本任务
名称:同步语雀文章到 Hexo 触发器:每天 操作:启动程序 程序或脚本:”C:\Python38\python.exe” 添加参数:”D:\File_Important\yuque_hexo\yuque_hexo.py”, 该文件内容如下:
1 2 3 4 5 6 7 8 9 10 11 12 13 14 15 16 17 18 19 20 21 22 23 24 25 26 27 28 29 30 31 32 33 34 35 36 37 38 39 40 41 42 43 44 45 46 47 48 49 50 51 52 53 54 55 56 57 58 59 import subprocessimport datetimeimport timerepo_directory = r"D:\blog_hexo" try : subprocess.run(f"cd /d {repo_directory} && git status" , shell=True , check=True , stdout=subprocess.PIPE) except subprocess.CalledProcessError as e: print ("切换目录时出现错误:" , e) exit(1 ) current_datetime = datetime.datetime.now() formatted_datetime = current_datetime.strftime("%Y-%m-%d_%H%M%S" ) with open (f"{repo_directory} /log.txt" , "w" ) as fw: fw.write(formatted_datetime + '\n' ) try : subprocess.run(f"cd /d {repo_directory} && yuque-hexo sync" , shell=True , check=True ) subprocess.run(f"git config --global --unset http.proxy" , shell=True , check=True ) subprocess.run(f"git config --global --unset https.proxy" , shell=True , check=True ) subprocess.run(f"ipconfig/flushdns" , shell=True , check=True ) subprocess.run(f"cd /d {repo_directory} && git add ." , shell=True , check=True ) subprocess.run(f"cd /d {repo_directory} && git commit -m '{formatted_datetime} '" , shell=True , check=True ) subprocess.run(f"cd /d {repo_directory} && git push" , shell=True , check=True ) print ("成功提交到GitHub" ) except subprocess.CalledProcessError as e: print ("=" * 80 ) print ("执行Git命令时出现错误:" , e) exit(1 ) import timetime.sleep(5 )
Hexo+Github Page+Github Action+语雀+OSS 部署
https://blog.zhequtao.com/content/op/deploy-fe-with-alioss.html
安装插件:npm install hexo-deployer-ali-oss –save
开通阿里云 oss,权限为 公共读
修改 hexo 博客根目录下的配置文件_config.yml ,修改如下部署配置
1 2 3 4 5 6 7 8 9 10 11 12 13 14 deploy: - type: git repo: github: url: https://github.com/xie-dd/xie-dd.github.io.git branch: master token: ghp_sgiscI*****qVgyXNw3kooiek0keA7n - type: ali-oss region: <您的bucket 地址> accessKeyId: <您的oss accessKeyId> accessKeySecret: <您的oss accessKeySecret> bucket: <您的bucket name>
hexo g -d 即可部署到 OSS在 oss 管理界面—数据管理—静态页面
默认首页: index.html
子目录首页:开通
文件 404 规则:Index
默认 404 页:空着即可
等待一段时间(真的要等待)才会生效,访问你的 Bucket 域名即可 hexoxdd.oss-cn-beijing.aliyuncs.com
现在的成果 方式 1:
在语雀写文章
在本地 cmd 执行下面代码,即可将语雀内容备份到本地与 Github 仓库,并部署到 Github Page
1 2 3 4 5 cd /d M:\blog_hexo yuque-hexo sync # 这一步是备份到本地,可以不执行,文章更新有延迟 git add . git commit -m "202310241546" git push -u origin master
方式 2
在语雀写文章
在 cmd 按照下面的方法部署,这样不会备份,也不会触发 Github Action
1 2 3 cd /d M:\blog_hexo yuque-hexo sync hexo g -d
方式 3 使用 Windows 任务计划程序自动执行
方式 4 Github 自动部署到 Github Page 与 阿里云 OSS
方式 5 语雀写完文章后点击发布,自动触发云函数,然后触发 github action
可能的错误 解决方法:https://blog.csdn.net/m0_69087087/article/details/128838186
1 2 3 4 5 win+r --- cmd git config --global --unset http.proxy git config --global --unset https.proxy ipconfig/flushdns git push origin master
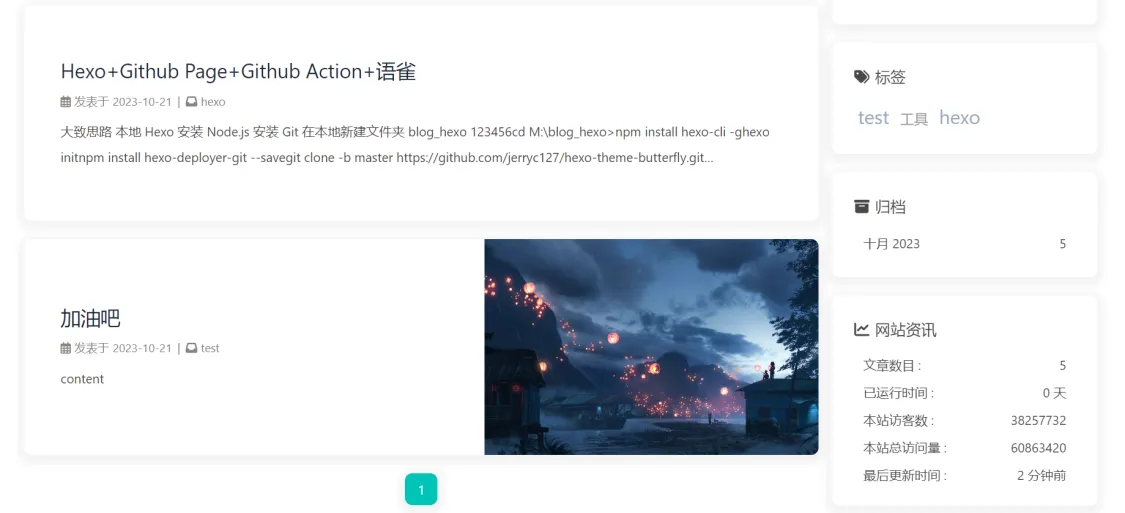
网站运行时间显示为 0 不知道我的 _config.butterfly.yml 文件 publish_date 这个地方为什么是 start_date,改回 publish_date 就好了
1 2 3 4 runtimeshow: enable: true publish_date: 2023 /10 /21 00 :00 :00
主题设置以及其它问题 图片问题 **方法 1 **
以 butterfly 主题为例,打开主题文件的 /themes/butterfly/layout/includes/head.pug,在 “meta(name=”theme-color” content=themeColor)” 后方添加 meta(name=”referrer” content=”no-referrer”),该步骤是确保语雀中的图片可以正常加载
1 2 meta(name="theme-color" content=themeColor) meta(name="referrer" content="no-referrer")
方法 2
在语雀中使用图片链接,而不是粘贴图片
评论系统 Hexo + Butterfly 评论功能
giscus 配置 hexo-butterfly 主题-giscus 评论系统设置 - 知乎
安装 Giscus:https://github.com/apps/giscus
配置 Giscus:https://giscus.app/zh-CN ,得到一段脚本,类似
1 2 3 4 5 6 7 8 9 10 11 12 13 14 15 16 <script src="https://giscus.app/client.js" data-repo="xie-dd/blog_hexo_comment" data-repo-id="R_kgDOKg***" data-category="General" data-category-id="DIC_kwDOKjyVRs4Car4o***" data-mapping="url" data-strict="0" data-reactions-enabled="1" data-emit-metadata="0" data-input-position="top" data-theme="preferred_color_scheme" data-lang="zh-CN" data-loading="lazy" crossorigin="anonymous" async> </script>
修改 主题文件下面两处内容 D:\blog_hexo_config.butterfly.yml
1 2 3 4 5 6 7 8 9 10 11 12 13 14 15 16 17 18 comments: use: Giscus text: true lazyload: false count: false card_post_count: false giscus: repo: "xie-dd/blog_hexo_comment" repo_id: "R_kgDOKjyVRg" category_id: "DIC_kwDOKjyVRs4Car4o" theme: light: light dark: dark option:
网页链接问题
在 Hexo 中使用 Hexo-abbrlink 生成唯一文章链接
Hexo 生成博客文章的链接时,默认格式 permalink: :year/:month/:day/:title/ ,如果标题中含中文的话,复制 URL 链接的话中文字符就会是一大串编码字符。如果想为每一篇文章生成唯一 ID 的话,推荐使用 hexo-abbrlink
在本地安装 npm install hexo-abbrlink -g
修改本地 config.yml 文件如下,注释原来的,启用新的
1 2 # permalink: :year/:month/:day/:title/ permalink: posts/:abbrlink/
修改文件 D:\blog_hexo.github\workflows\main.yml,添加一行 npm install hexo-abbrlink -g
1 2 3 4 5 6 7 8 - name: 设置 Hexo 依赖项并生成 Public 文件. env: YUQUE_TOKEN: ${{ secrets.YUQUE_TOKEN }} run: | npm install hexo-cli -g npm install hexo-abbrlink -g npm install yuque-hexo -g
文章最下面作者与链接 修改文件 D:\blog_hexo_config.yml, 里面的 author url 即可
搜索系统
进入官网地址 注册 — 点击左下角 Data sources 图标—Indices—Creat Index
点击左下角 Setting 图标—API Keys—All API Keys—New API Key
在弹窗中:有一个选项选择前面创建的 Index, 最后的 ACL 选择以下 7 项:search,browse,addObject,deleteObject,deletelndex,listlndexes,usage, 其它默认,最后点击 Create
点击左下角 Setting 图标—API Keys—Your API Keys,获得三个参数 Application ID,Search-Only API Key,Admin API Key
安装插件 npm install hexo-algoliasearch
修改 D:\blog_hexo_config.yml ,添加如下代码,记得把###替换
1 2 3 4 5 6 7 8 9 10 11 12 13 14 15 16 # 搜索内容 algolia: appId: "###" apiKey: "###" adminApiKey: "###" chunkSize: 5000 indexName: "blog_hexo" fields: - content:strip:truncate,0,500 - excerpt:strip - gallery - permalink - photos - slug - tags - title
修改 D:\blog_hexo_config.butterfly.yml
执行 hexo algolia
1 2 3 4 5 6 7 8 algolia_search: enable: true hits: per_page: 10 labels: input_placeholder: Search for Posts hits_empty: "我们没有找到任何搜索结果: ${query}" hits_stats: "找到${hits}条结果(用时${time} ms)"
如果使用了 Github Action, 还需要修改 D:\blog_hexo.github\workflows\main.yml
1 2 # 在安装 hexo-cli 的地方添加一行 npm install hexo-algoliasearch -g
Front-matter 1 2 3 4 5 6 7 8 --- title: 标题 categories: [A] tags: [A, B, C] date: 2023-10-23 updated: 2023-10-23 cover : 封面头图链接文本 ---
cover: 控制主页上每篇文章显示图片,如果不设置,则主页文章没有图片
top_img: 控制文章内最上面图片,如果没有,则使用 cover 的图片
SEO 优化
https://zhuanlan.zhihu.com/p/344927945
百度收录
https://zhuanlan.zhihu.com/p/100922816
验证时,使用文件验证,下载百度给的 html 文件放到 source 文件夹
修改刚才的 html 文件,添加下面的前三行
1 2 3 4 --- layout: false --- cada67d9dde712f908945c31d3ed3451
其它参照一般的教程即可
提交收录时选择 sitemap 收录【sitemap 提交工具仅对已验证站点开放使用】,先执行以下命令生成 baidusitemap.xml,部署到 Github Page
1 2 npm install hexo-generator-baidu-sitemap --save hexo g
在百度平台—资源提交—普通收录—sitemap, 添加一条
1 https://20161101.xyz/baidusitemap.xml
实在不行,手动提交 ,将链接粘贴后,提交
也可以使用 API 提交,使用使用定时任务执
1 2 cd /d D:\blog_hexo\public curl -H 'Content-Type:text/plain' --data-binary @baidu_urls.txt "http://data.zz.baidu.com/urls?site=https://20161101.xyz&token=****"
文章排序 希望文章安装更新时间排序,修改文件:D:\blog_hexo_config.yml
1 2 3 4 index_generator: path: "" per_page: 10 order_by: -updated
ICP 备案号 打开文件 D:\blog_hexo\themes\butterfly\layout\includes\footer.pug ,添加下面一行
1 2 3 <span> | 豫ICP备<a href="https://beian.miit.gov.cn/" target="_blank">2023031381</a>号</span> <span> | <img src="https://mypic2016.oss-cn-beijing.aliyuncs.com/picGo/202311231912584.png" height="16" width="16" style="display:inline-block;"> 豫公网安备<a href="https://beian.mps.gov.cn/#/query/webSearch?code=41140002000710\" target="_blank">41140002000710</a>号</span>
主页文章显示数目以及归档页文章显示数目
主页文章显示数目只需在 _config.yml 中调整
1 2 3 4 index_generator: path: '' per_page: 10 order_by: -updated
plain npm install --save hexo-generator-archive
然后在 _config.yml 中添加:
plain archive_generator: per_page: 5 yearly: true monthly: true
添加导航 _config.butterfly.yml
1 2 3 4 5 6 7 8 9 menu: 主页: / || fas fa-home 归档: /archives/ || fas fa-archive 分类: /categories/ || fas fa-folder-open 标签: /tags/ || fas fa-tags Link||fas fa-link: flarum: https://flarum.19970622.xyz/ || fa-solid fa-share-from-square # Movie: /movies/ || fas fa-video # About: /about/ || fas fa-heart


